Showing posts with label Art. Show all posts

Wednesday, September 28, 2022

Summer Recap

 Every year, I take my summer vacation at the beginning of July so I can complete some big projects to prepare for all our summer activities. I don’t like to travel so going places is never on my vacation agenda. Relaxing is something I find difficult – maybe even stressful – I like to be busy. There are some types of ‘busy’ that I enjoy more than others and my summer projects are high up on my list.

Spring 2022 was so late, so wet, so…. depressing that it was really hard to get excited about summer projects. In fact, it was mid-June already when my husband asked, “What are your summer projects this year?” and I realized that I hadn’t even started making my list. Of course, there were things I wanted to do but nothing that I considered a BIG summer project – just a bunch of little things that I would normally plan as weekend projects.

The most obvious project to put on the summer list was the climbing wall – which I had purchased the supplies for last fall and planned to build as soon as the snow melted and have ready for when the school-age children were here for Spring Break – but it was still ‘winter’ when school was out for spring bbreak. The climbing wall was probably the most noticeable vacation project and very popular with the children all summer.

child on climbing wall

The second most noticeable project was the roof over the corner house – and I don’t even have a picture of it. Creating the corner house to replace the tipi was one of my 2021 vacation projects that I didn’t have time to complete the way I initially envisioned. I had simply made a temporary lean-to type of roof last year. This year I designed and built a better roof and moved all the bus benches into the corner house. It was a very popular sit spot all summer – I can’t fathom why I didn’t manage to get a picture of it. *sigh*

I also didn’t any pictures of the new layout of stumps, logs, and steppingstones in the mulch area or the enlarged ‘river’ area. I spent three whole days rearranging the pathways to align with the bridges and entrances to the building and digging areas. It was a very labour intensive project but not something particularly noticeable if you hadn’t spent a lot of time in the yard.

The children and I found the new pathways to be much more functional – as did this little visitor to my yard – caught on my surveillance camera, he/she followed the new curvy path perfectly all the way from the back gate to the side yard. LOL

skunk walking through yard

I expanded the ‘river’ area to make space for a new dedicated area for water play. I added a hand pump so the children could get water for creating concoctions. There was a delay in getting this area ready for use. The hand pump I originally chose did not function properly and was eventually replaced with this bilge pump.
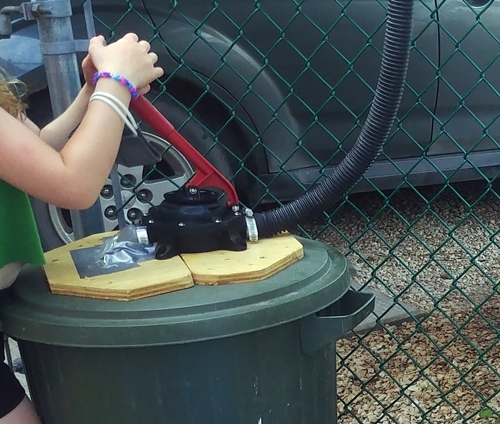
child using bilge pump

The trick here though is that getting water requires some communication as the pump is not near the spouts…

children playing with water
Child collecting water

This area is still a work in progress – we hope to add more pipes, hoses and storage for other concoction making supplies. Of course, we are still collecting supplies too! It was a very popular play area this summer.

I also added a new painting panel. We’ve had several built-in plexiglass panels in the past and I have found that they get damaged in the winter. The framework I built for hanging this one is permanent but the panel itself is removable, so the space is still multipurpose, and the panel can be safely stored when not in use.

Children painting

I love plexiglass for painting on – even better when you can access both sides – and with the garden as a backdrop the artwork is enhanced.

Children's artwork

Well, that didn’t seem like a lot of dramatic changes to our learning environment. Certainly not any major transformations. Still, there were enough little projects to keep me busy on my ‘vacation’ and some new spaces for the children to explore this summer. In my next post I will highlight a few of our summer activities.

Sunday, December 27, 2020

Catching Up


I’m spending a portion of this four day holiday weekend catching up on some of the things I never seem to have enough time for. This morning my task list included going through a multitude of photos I have taken and deciding which to delete, file, add to the entrance area slideshow or write blog posts about.

Now I have to actually write some posts – this first one is actually about TWO projects that we worked on last summer. Yes, I am that far behind which is why I’m combining two projects in one post.

Back in June I wrote about the new octagon shaped dining table. I also wanted to write about the place mats the children (aged 2-8) made to define their spaces at the table. Each child worked on their place mat design independently so each one would be unique as some of the children are prone to copying or competing with others.

When they were all complete and dry I covered the place mats with clear plastic film to protect them from spills. Only once they were all together on the table did the children get to see what the others had created.

For several weeks these place mats were the main focus of discussions around the table at meal/snack times. The conversations were amazing. So many questions. So much interest in what others had done.

Interestingly it was the work of the two-year-old that garnered the most attention – ‘Hey, how did he do that?’

The answer to that question is ‘After he added paint, he used the handle of the brush to create the textured pattern’. This was exactly why I had them all work independently. Had they all been painting at the same time then either someone would have ‘corrected’ him by telling him he was using the wrong end of his paint brush or everyone would have copied him and the place mats would have all looked the same… End of conversation.

The second project didn’t involve the children but was a space I created for the children. The ‘Nature Area’ is the small room off the main play space. It has always been a quiet space to read, relax or reflect. This post from last year show what it used to look like after the addition of the nest swing.

The babies’ cribs used to be situated on opposite sides of the room with their long side against the wall and the ‘quiet’ space in the centre of the room. There was some ‘extra’ space at the ends of the cribs – not really enough to be considered useful for storage space or play space just wasted space. Wasted space bothers me immensely.

Last summer I moved both cribs to the same side of the room with their short sides against the wall and the cot storage between them – no more wasted space. At nap time a temporary divider wall is placed between the cribs to provide a little privacy for sleeping babies now that they are much closer to each other.

The open area of the room is now considerably larger with the addition of the space on the other side of the room. I rearranged the trees and added some cushions and a wall tapestry. It is now a much more cozy, comfortable area for reading and relaxing.

There is still plenty of open space in front of the window if the children want to stand and look outside at ‘real’ nature. Of course there are still fake branches, bird and butterflies to look up at when you lay on the nest swing.

But that could change too. I did buy another tapestry that I considered hanging on the ceiling here…but I love it so much I might put it somewhere else. I just haven’t yet decided where that may be…


Friday, January 24, 2020

December Fun

I am seriously behind on writing posts for my blog so just clearing some out some of the December photos with brief descriptions…

Last summer I had bought some waffle bowls for ice cream but nobody liked them and they were just going stale in the cupboard. I decided they could be put to use as ‘gingerbread’ houses for the toddlers.

We simply used cereal for decorations and ‘glued’ the pieces on by dipping them in icing.
 
 
Some chose to make a ‘hat with a pompom’
 
 
The bowls were fragile so if you used too much decorating force you created a ‘bear cave’
 
 
Some chose to create… a bowl for their cereal LOL
 
 
Everyone seemed to really enjoy this activity and because process is much more valuable than product I was fine with our non-traditional gingerbread houses until…my husband came home and said ‘Cool, you made yurts’. Huh, I should have thought of that.


Of course in December we also had to take advantage of my school bus driver husband being off work and able to do fire duty (it is too risky for me to watch both toddlers and fire by myself). We didn’t cook our whole lunch on the fire as we have in the past but bannock cooked on the fire is sooo good.

Add homemade Christmas Jam supplied by one of the children’s parents…
 
and we don’t care how cold it is..mitts are off and it is time to eat!

Sunday, September 30, 2018

Tiles

When one of my childcare parents asked me if I wanted some tile samples from her workplace I of course said yes – I wasn’t certain what I would use them for but I knew I’d find something.  Removing all the tiles from the sample boards/books was a very long and difficult task but sorting and organizing them by size and colour was much more fun.  If the tiles were not so breakable they would make wonderful loose parts just like that but with a mixed age group that includes infants and toddlers there are some safety concerns.
My first project didn’t involve the children – I glued some of the tiles on an old spool to create a table for our outdoor play space.  This was done during my vacation as part of my most recent outdoor play space renovation.
18-09-tiles00
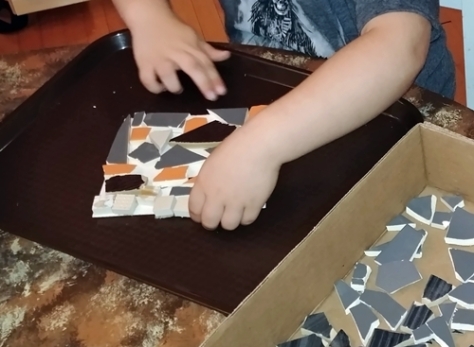
Still, I also wanted to find a way that the children could use the tiles too.  I decided that mosaic pictures or stepping stones for the garden would probably be the best choice.  The majority of the tile samples were too large to use whole so I thought the children would like to help break them up.  For a few hours on two consecutive summer days I sat in the yard breaking tiles while the children ran around fully engaged in other activities.  I was a little surprised my invitation to smash stuff got no interest but I certainly wasn’t going to insist they stop what they were doing and join me.
Initially I planned to use cardboard trays as forms for cement ‘stones’ and let the children decorate them with the broken tile pieces – with direct supervision I thought even the youngest ones could do this.  However, after reading cement making directions and calculating the amount of cement needed to fill each tray, I had doubts about being able to make enough cement to fill all the cardboard trays I had collected AND supervise children too.
I thought about how I had glued the tiles to the old wooden spool and decided that would be an easier way to do it.  I cut cedar fence boards into squares to use as the base.  Using cedar the finished ‘stones’ could be used outdoors for garden decorations or indoors if they preferred. Also, because the cedar squares were much smaller than the cardboard forms I originally planned to use there was a better chance the children would complete at least one.
There were many steps for this project so this allowed us to work on it over a long period of time.  Not all the children worked on their creations at the same time but most of the work was done at quiet time when babies were sleeping.  Ultimately, due to the sharp edges of the broken tiles and the toxicity of some of the supplies, I felt  it was not a developmentally appropriate activity for the littlest ones even with direct supervision.
For the first step I provided each child with a cardboard base the same size as the cedar squares.  They used this to dry fit the tile pieces taking as much time as they needed to choose and arrange tiles to create their designs.
18-09-tiles01
When they were happy with their design I mixed floor leveler cement to use as an adhesive for the tiles.  I had considered several adhesive options but decided on the floor leveler because;
  1. I had a bag of it already because I’ve used it on my home floors
  2. I pretested it on the cedar & tiles and it worked very well
  3. I can mix it in small batches as needed
  4. It dries quickly (maybe a little too quick)
  5. Cleanup is fairly easy
The next step was to put the cement on the cedar boards – the children enjoyed watching the wet cement flow across the board.  No pictures of this as we had to work quickly at this point.  Each child then had to transfer their pattern from the cardboard template to the cedar board before the cement dried.
18-09-tiles02.jpg
Interestingly all three of the four-year-olds managed to complete this step with only a couple ‘extra’ pieces that didn’t fit on their boards.  The school-age children were much slower, overthinking the process and trying to change their patterns. They ended up with many leftover pieces and some spaces where the cement dried before they could get any tiles on.
Now, when I originally planned this activity this would have been the finished product but although the floor leveler cement worked well to adhere the tiles to the boards, it wasn’t thick enough to cover the sharp edges of the broken tiles.  If we had used thick concrete in cardboard forms we could have pushed the tile pieces in far enough that they would have been flush with the concrete surface.  Alternatively, if the tiles had all had straight edges and been arranged close together then there wouldn’t have been large gaps.
However, we did have large gaps and sharp edges and my solution was to use grout.  Luckily, I had plenty on hand leftover from when I tiled the back splash in my kitchen.  I mixed it in small batches and let the children spoon it into the gaps – I know, not proper grouting technique but it worked.
18-09-tiles03
Then came the final step – washing off the extra grout.  This proved to be everyone’s favourite step.  In fact, now that I know how much these children LOVE using warm soapy water and sponges I have many more ‘projects’ planned for them ðŸ˜‰
18-09-tiles04
This was a very long project – nearly six weeks from the time I first broke the tiles until the last child completed their mosaic board.  Probably wouldn’t have take that long if we didn’t work on it only in small groups at quiet time and didn’t have to wait for things to dry between steps. Yet, those were some of the ‘special’ things about this project too.
Here are a few of the finished products;
18-09-tiles05

Monday, February 15, 2016

Glue

I both love and detest glue.  I love its potential as a tool for crafts - to adhere two or more items together.  However, there is a long list of annoying things about glue.

Sometimes it is too wet - damaging the paper or taking too long to dry so the children get frustrated and often give up before they successfully complete their project.  Glue is easily spilled and difficult to get it from the container to the spot you want it to be.

Sometimes it is too dry - clogged squeeze bottles, shriveled up glue sticks, glue pots containing rubberized mounds of  old glue.  I find it nearly impossible to have good glue available for the children to use independently whenever they want it.  At least 75% of all the glue I buy gets wasted - thrown out without ever getting used for crafts.

Cleaning up glue is another frustrating task.  Using water just thins it out spreading it further and further until the entire table is coated.  A dry paper towel sticks to the glue on a table more permanently than any of the craft supplies we tried to attach.  Clean-up is more time consuming than set-up and creation combined.

In an effort to find a solution to my issues with purchased glue I've tried several homemade glue/paste recipes.  Most have failed to provide good results - often easy to work with but the crafts simply fall apart after the glue dries.  However, recently I tried this recipe;

• 1 1/2 Cups Water
• 2 Tablespoons Light Corn Syrup
• 1 Teaspoon White Vinegar
• 1/2 Cup Cornstarch
Pour 3/4 cup of the water into a medium sized pot along with the corn syrup and vinegar. Bring this mixture to a full boil, stirring often.
While you are waiting for that mixture to boil, mix the remaining cold water and the cornstarch together. Beat well to remove all of the lumps. Slowly stir the water and cornstarch into your boiling mixture, stirring constantly. Bring this mixture to a boil and let it boil for 1 minute. Remove the pot from the heat and let cool.
Once cooled, put the glue in a covered container and wait at least a day before using.
 
The resulting jelly-like product was easy for even the youngest artists to scoop and spread;

16-02-glue01

Everyone was impressed by how easy this glue was to work with;

16-02-glue02

It is so sticky that layers upon layers of papers were quickly adhered together;

16-02-glue03

Even when only part of the paper touched the glue gravity wasn't strong enough to release it after it dried - and it dried quickly too;

16-02-glue04

Stored  in a covered container, the homemade glue was still sticky and spreadable the following week but I wasn't certain how long it would remain 'good' so I decided to use all the remainder in our sensory bin.  I gathered a bunch of other leftovers - shredded paper, sand, powdered paint, potpourri, etc.  The toddlers were curious and examined the dry 'ingredients'.

16-02-glue05

I envisioned that once the glue was added we would be able to use the mixture much like clay and form it into shapes.  However, the children were hesitant to touch it now.

16-02-glue06

It was so very sticky that mounds of shredded paper was instantly stuck to the hand of anyone who dared to touch the glue.  It was an extreme sensory activity.  One by one the children began to mix the items together in the bin - very hesitantly - mostly just trying to bury the glue.

16-02-glue07

It wasn't until I added a bit of water that the children became less reluctant to participate.  Even then they didn't really seem to like the incredible stickiness.  They were however fascinated by the potpourri - picking out the bigger pieces and peeling apart the layers.

16-02-glue08

Not what I was expecting but very interesting to watch.  Still, the best was yet to come.  This glue, as sticky as it seems, cleans up in seconds.  I was so very impressed.  A quick rinse under running water and it is completely gone!  No sticky hands. No messy containers. No residue on the table.  Nothing.

Easy to make.  Easy to use. Easy to clean up.  Wow!

Wednesday, October 28, 2015

Coloured Paper

The basic craft supplies are always available for the children to use independently throughout the day – pencils, crayons, chalk, scissors, glue, tape, rulers, magazines and various types of paper. The children’s choice of paper is something that I find interesting.  The current school-age children go through vast amounts of plain white paper, cutting pieces and gluing/taping them together to create books, masks etc.  They seem to have no interest in the coloured paper or adding colour to their projects – unless there is paint.

The school-age children I had here for the summer preferred to use the lined paper.  They created impressive stories and art work filling every space on one paper before selecting another piece of lined paper.  They never chose plain white paper or coloured paper.

For the preschoolers paper choice is a major decision often taking more time than anything that they add to the paper.  Coloured paper has been their favourite ever since I showed them that the white pencils/crayons were not ‘broken’, but you could only see them on darker paper. If several of the preschoolers are at the table at the same time the paper choice process takes even longer since they often rethink their colour choice if the others pick a different colour.

Every time I restock the coloured paper the selection process is the same.  Pink paper is always the first choice and when all the pink paper is gone they will choose purple.  After that the decisions get more difficult – light blue, dark blue, red or black get used up next but they definitely are not the preferred colour choices.  In fact, after the pink and purple are gone they often choose plain white or lined paper over the other coloured paper.

Eventually the stack of coloured paper contains only yellow, orange, green, and brown.  The preschoolers will occasionally use these colours but they never seem pleased about it.  So, as the sad looking four year old sighed and reluctantly picked a yellow paper from the dwindling pile I asked  “Why don’t you like these colours?”  She replied “I like them but they are your favourites.”

?!?!?!


Yes, they are.  Throughout all our activities we often discuss favourite colours as well as other likes & dislikes but until she mentioned it I had never even noticed that the ‘leftover’ paper pile contained all my favourite colours.  Awww, all this time have they been leaving those papers for me?  I always thought they picked pink and purple first because they liked those colours best but now I’m wondering if they chose them because they know I don’t like pink and purple. 

They’re very perceptive.

15-10-paper01

Saturday, October 3, 2015

Yard Projects

As mentioned in my previous post there have been many small yard projects I have tackled this summer.  Several years ago we put our old claw foot tub in the yard – re-purposed as a fire pit.  It was placed as a divider between the gravel area and the grass area but because of the rounded shape of the tub it didn’t really prevent the gravel from spilling over into the grass.  Originally we just had a board that sat just inside the tub to prevent access to the soot and debris but it didn’t prevent rain from soaking the fire pit.  Last year my husband made a cedar cover for the tub.


 It drives me crazy that he didn’t arrange the different coloured boards to create a pattern but I do love the smell of cedar so I try to focus on that instead.  The tub cover makes a great table for many of our group activities like this one;

15-10-yard01 

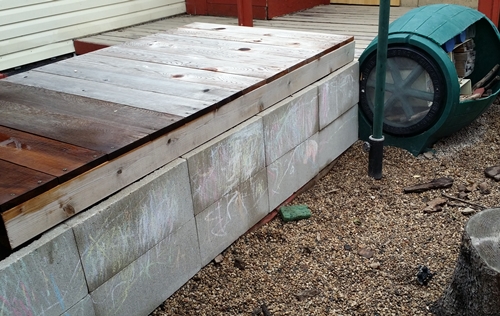
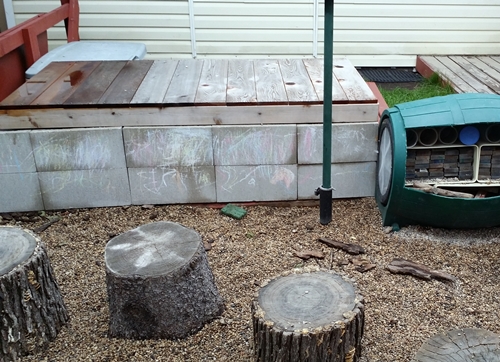
However it doesn’t do anything to prevent the gravel from spilling over into the grass.  So, this summer I placed some cinder blocks along the cribbing beside the tub.  They line up with the edge of the cover and as an added bonus they make a great surface for chalk drawings;


 15-10-yard02 

15-10-yard03 

 There was another issue with the tree stumps too.  The children often like to use the stumps as tables – nothing wrong with that but it did sometimes get in the way of the children who wanted to walk on the stumps.  Some of the children also didn’t like to sit on the gravel beside their ‘table’ but had trouble finding suitable items to use for chairs.

As mentioned in my last post, this summer I rearranged the stumps to create a circular path around and over the hill.  I also had my husband cut a couple of the smaller stumps in half.  These were then put on the other side of the yard in front of the tipi along with one of the biggest stumps to create this;


 Since ‘the table’ is not part of the stump path dramatic play ‘meals’ don’t get in the way of active play.  Yes, sometimes the children do like to climb on these stumps too and sometimes they still use other stumps as tables but at least now they have more options and fewer disputes.

15-10-yard05

Sunday, August 17, 2014

Creative Summertime Freeplay

This has been a quiet summer.  Quiet meaning the children have needed very little direction from me.  This year’s group is very independent which has left me plenty of time for observation.
Indoors the trains have been neatly organized in the tubes instead of the block bin with the train tracks.  It was not my idea but I like it :-)

0-parking

That is the only indoor picture that I have because we’ve been playing outside most of the time.
All the loose parts have provided endless opportunities for creativity and symbolic play.  These ‘eggs’ are neatly arranged by size;

1-eggs

Of course there were many picnics and restaurants;

2-picnic

The little tree cookies were used to create paths between and around the larger stumps;

3-steps

There was an ice cream shop with a wide variety of menu choices;

4-icecream shop

A grand pony expedition – I love that these children can use action figures creatively without following a movie script;

5-ponies

There was also an elaborate dramatic play activity involving the whole group.  The main characters were ‘sabre tooth grizzly birds’ and since I had trouble envisioning what they would look like I asked for a picture of one;

6-STGBird

This picture was made possible thanks to an accessible outdoor art area.

I also asked them to make a list of art items they’d like to have available.  There is plenty of paper so I was a little surprised by the size of the list they made;

7-list

Even our outdoor snack time has been a creative activity;

8-ODsnack

And finally, this little pine cone family has been waiting patiently all weekend.

10-pinecones

I wonder what they will be doing when the children return…