Around here we wash our hands a lot – before and after every
meal/snack, after diaper changes/bathroom breaks, after outdoor play,
after crafts/sensory play activities and more. We’ve been doing this
since the first day I opened my childcare home. Even before the babies
can stand on their own I hold them and help them to wash their hands –
teaching them all the steps until they can do it on their own. It
becomes a habit – a good habit.
The children are also not allowed to share hand towels when drying
their hands. Early in my career I briefly used small cloths for drying
hands – single use, one per child after every hand washing and
laundered daily. Even with my small group of children it was a lot of
laundry. It didn’t take long for me to switch to single use paper
towels.
For more than twenty years now we have used paper towels to dry our
hands. They were convenient and with the dispensers they were easy for
even the littlest ones to use independently. The monetary cost wasn’t
unbearable but the environmentalist in me sometimes wondered if there
was a better option.
As long as we used a separate bin for used paper towels I could put
them in my composter but especially during the winter we would run out
of room for them. Around here the only bin that never gets very full is
the garbage bin – other than diapers and cat litter almost everything
else gets recycled, reused or composted.
When the children crumpled their paper towel in a ball before trying
to dry their hands we’d do ‘science’ experiments to show how much more
effective they were when they were flat as opposed to balled up. I
found it particularly frustrating when the older children would quickly
yank three or four paper towels from the dispenser, fold them in half,
toss them in the bin and then wipe their hands dry on their clothes.
Ugh! Seriously – WHY?
Sometimes I’d see whole stacks of unused paper towels in the bin
because they just fell out of the dispenser and someone decided to toss
them instead of reloading. A few years ago I doubled the size of my
composter but we still don’t have enough room for all those paper towels
which take up more space than all our food scraps.
I contemplated going back to using cloths and doing laundry but
decided against it. Instead I started researching commercial air hand
dryers and discovered that there were many compact affordable options
available. In fact, some were smaller than the paper towel dispensers
and cost less than a one year supply of paper towels!
A month ago I bought two – one for the bathroom and one for the kitchen. I should have done this years ago! We are loving the hand dryers.
Except every once in a while when I hear a dryer running longer than necessary and find a child huddled underneath it. *sigh* ‘If you are cold we can get you a sweater.
Another two week vacation, another big outdoor project – perfect! But
before I tell you what I did on my vacation I’ll give you a little yard
history.
The upper deck existed before my childcare home opened. It separated
the South facing backyard from the East facing side yard. The side
yard was the dog’s yard and the vast space under the upper deck was her
dog house. The play space in the back yard consisted of a 300 sq ft
gravel area with a play structure and a 360 sq ft ground level deck.
The outdoor toys were stored in a tarp wrapped wooden frame shed built
against the West fence.
There was no back wall on that little toy shed because it was
positioned against the fence. It was about 15 years ago that we moved
the toy shed so we could use that spot for our first garden – it was the
only spot in our back yard that was not deck or gravel. We then
attached the toy shed to the South side of the upper deck where the open
back allowed us to extend the toy storage to the space under the deck
(after we made the dog house smaller).
The tool/garden shed was located by the carport – South of the lower
deck and East of the gravel area. When we decided we needed a bigger
garden space, we took the tool shed apart and rebuilt it ON the rarely
used lower deck and attached it to the front of the toy shed. We then
put in a bigger garden where the tool shed had been.
This picture was taken many years ago on the upper deck;
The shelf and framed white panel on the right side is the back and
top of the old toy shed. The higher redwood wall beyond it is the back
of the tool shed. Not visible in the picture – back door of the house
behind me, stairs down to the back yard on the right, and stairs down to
the side yard on the left. Also not shown is the bike shed which is in
the side yard attached to the North side of the upper deck.
We had created ‘Frankenshed’ – it had a very large foot print but
inefficient storage. You could enter the bike shed from the side yard,
then crawl under the upper deck, go through the toy shed and then go
out the tool shed into the back yard. However, it wasn’t a convenient
path – more like a labyrinth where there was the possibility you could
be lost for long periods of time. Sometimes when the children asked for
toys that were stored I would tell them I’d see if I could find them on
the weekend. I was never sure how long it might take me to find the toy
and get back out of Frankenshed.
The only good way to get from the back yard to the side/front yard
was by going over the upper deck. Even the lawn mower, snow blower,
bikes and lumber had to be taken this way. It was frustrating at times.
When the children and I were out in the back I couldn’t see the front
gate because the upper deck and Frankenshed blocked my view.
Consequently we rarely played outside later in the day when there was
the chance parents may arrive.
So, on my vacation we;
built a new tool shed in the side yard
sorted all the stored items from all the sheds
took apart the garden shed, toy shed, potty house and bike shed
removed half of the upper deck and one staircase and moved the other staircase
built a new toy shed and a new garden shed/potty house
disassembled, repaired and reassembled the garden wall
created a new ground level walkway
We worked outside for 10-12 hours each day of my two week vacation.
It was wonderful! Now I want to spend even more time outside in the
yard. Some of the changes are actually quite subtle but almost every
part of the yard has changed at least a little bit so I’ll include
before and after pictures for each corner of the back yard.
NW yard in 2018
NW yard in 2019
The old potty house – by the water barrel in the back of the garden –
was used only for potty training toddlers who couldn’t make it inside
quick enough. Now that area is our new convenient toy storage shed.
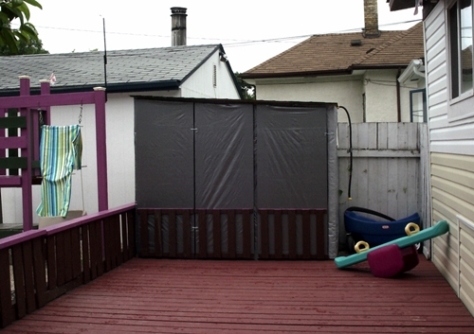
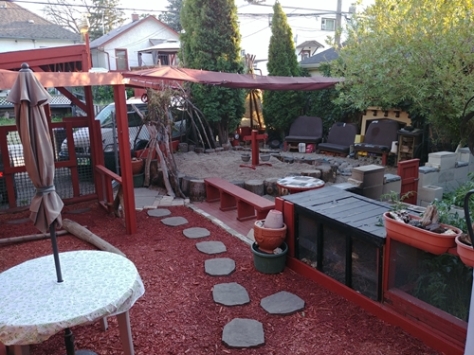
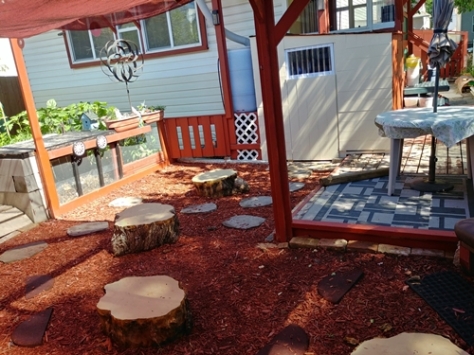
SW yard in 2018SW yard in 2019
Picture angle is slightly different due to the movement of the stairs
so the entrance to the back yard is now six feet farther East. Many of
the stumps, stepping stones and tables have been moved too.
SE yard in 2018SE yard in 2019
Again, stepping stones, stumps and table moved. Added rope swings
and removed sensory bins – the bins now have a spot in the gravel area
with the toys instead of being in the active play area.
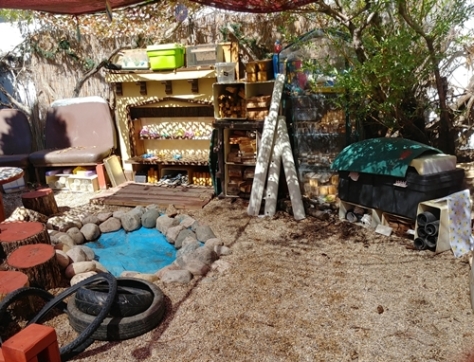
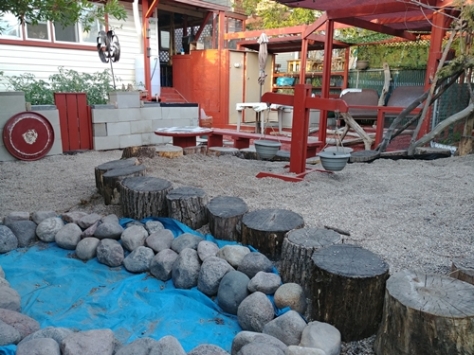
Construction area & kitchen
The pond was moved to make room for a larger loose parts/construction
area. In the old fireplace mantle we added shelves for storage of
dishes & pots which never had a dedicated space before. There is
also a counter which can be used for ‘cooking’ but can also hold the
sensory bins when we want to use them.
NE yard in 2018
NE yard in 2019
Here is where you see the biggest difference. The cinder block
garden wall was originally built on the wooden cribbing for the gravel
area. The wood was deteriorating and sections of the wall were tilting
in different directions. The wooden cribbing was replaced with an
additional row of cinder blocks. I doubled the size of the awning so we
have twice as much shade. The ‘pond’, rocks, table, stumps etc were
rearranged to create a larger construction area and make room for the
sensory bin area (not visible in this picture).
The stairs and a portion of Frankenshed were visible in the 2018
photo but in the 2019 photo there is only the smaller garden shed/potty
house. This new little shed was built entirely from wood salvaged from
the old shed and deck. The potty shed half is large enough for diaper
changing and also has running water.
This next picture shows my view from the bench by the carport – on
the East side of the garden shed I can now see all the way through the
side yard to the front gate! The ground level walkway (also built from
recycled deck boards) has enough space for the art table which used to
be on the upper deck and was not visible from the yard. There is a
small gate beside the garden shed to prevent any of the littles from
wandering into the side yard which is still not a play area.
That’s enough writing for now – I’m going outside to play…
When one of my childcare parents asked me if I wanted some tile samples from her workplace I of course said yes – I wasn’t certain what I would use them for but I knew I’d find something. Removing all the tiles from the sample boards/books was a very long and difficult task but sorting and organizing them by size and colour was much more fun. If the tiles were not so breakable they would make wonderful loose parts just like that but with a mixed age group that includes infants and toddlers there are some safety concerns.
My first project didn’t involve the children – I glued some of the tiles on an old spool to create a table for our outdoor play space. This was done during my vacation as part of my most recent outdoor play space renovation.
Still, I also wanted to find a way that the children could use the tiles too. I decided that mosaic pictures or stepping stones for the garden would probably be the best choice. The majority of the tile samples were too large to use whole so I thought the children would like to help break them up. For a few hours on two consecutive summer days I sat in the yard breaking tiles while the children ran around fully engaged in other activities. I was a little surprised my invitation to smash stuff got no interest but I certainly wasn’t going to insist they stop what they were doing and join me.
Initially I planned to use cardboard trays as forms for cement ‘stones’ and let the children decorate them with the broken tile pieces – with direct supervision I thought even the youngest ones could do this. However, after reading cement making directions and calculating the amount of cement needed to fill each tray, I had doubts about being able to make enough cement to fill all the cardboard trays I had collected AND supervise children too.
I thought about how I had glued the tiles to the old wooden spool and decided that would be an easier way to do it. I cut cedar fence boards into squares to use as the base. Using cedar the finished ‘stones’ could be used outdoors for garden decorations or indoors if they preferred. Also, because the cedar squares were much smaller than the cardboard forms I originally planned to use there was a better chance the children would complete at least one.
There were many steps for this project so this allowed us to work on it over a long period of time. Not all the children worked on their creations at the same time but most of the work was done at quiet time when babies were sleeping. Ultimately, due to the sharp edges of the broken tiles and the toxicity of some of the supplies, I felt it was not a developmentally appropriate activity for the littlest ones even with direct supervision.
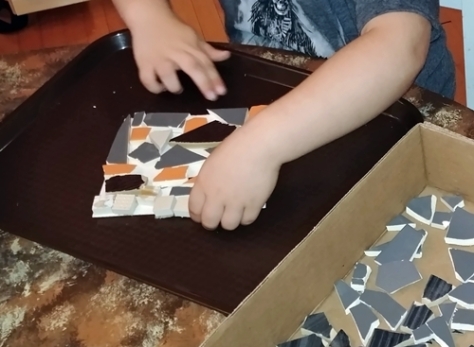
For the first step I provided each child with a cardboard base the same size as the cedar squares. They used this to dry fit the tile pieces taking as much time as they needed to choose and arrange tiles to create their designs.
When they were happy with their design I mixed floor leveler cement to use as an adhesive for the tiles. I had considered several adhesive options but decided on the floor leveler because;
I had a bag of it already because I’ve used it on my home floors
I pretested it on the cedar & tiles and it worked very well
I can mix it in small batches as needed
It dries quickly (maybe a little too quick)
Cleanup is fairly easy
The next step was to put the cement on the cedar boards – the children enjoyed watching the wet cement flow across the board. No pictures of this as we had to work quickly at this point. Each child then had to transfer their pattern from the cardboard template to the cedar board before the cement dried.
Interestingly all three of the four-year-olds managed to complete this step with only a couple ‘extra’ pieces that didn’t fit on their boards. The school-age children were much slower, overthinking the process and trying to change their patterns. They ended up with many leftover pieces and some spaces where the cement dried before they could get any tiles on.
Now, when I originally planned this activity this would have been the finished product but although the floor leveler cement worked well to adhere the tiles to the boards, it wasn’t thick enough to cover the sharp edges of the broken tiles. If we had used thick concrete in cardboard forms we could have pushed the tile pieces in far enough that they would have been flush with the concrete surface. Alternatively, if the tiles had all had straight edges and been arranged close together then there wouldn’t have been large gaps.
However, we did have large gaps and sharp edges and my solution was to use grout. Luckily, I had plenty on hand leftover from when I tiled the back splash in my kitchen. I mixed it in small batches and let the children spoon it into the gaps – I know, not proper grouting technique but it worked.
Then came the final step – washing off the extra grout. This proved to be everyone’s favourite step. In fact, now that I know how much these children LOVE using warm soapy water and sponges I have many more ‘projects’ planned for them
This was a very long project – nearly six weeks from the time I first broke the tiles until the last child completed their mosaic board. Probably wouldn’t have take that long if we didn’t work on it only in small groups at quiet time and didn’t have to wait for things to dry between steps. Yet, those were some of the ‘special’ things about this project too.
The bees love the giant hyssop in the garden and the children love to
watch the busy bees. Yesterday we were excited to have a new visitor
who stayed for most of the morning;
The children have been busy too, there are so many new spaces to
explore in our yard. The toys and loose parts are now spread out around
the yard so the storage area isn’t so congested.
One of my vacation projects was to re-purpose our old rain barrels
into loose parts storage bins. The two that cracked this past winter are
now located in the North-East corner of the gravel area;
The oldest water barrel – which has been waiting for years to get a
new purpose – now stores all the larger pieces of scrap lumber. It is
located in the South-West corner of the yard by the tipi.
This ‘new yard space’ was created in what used to be the parking area and is now the children’s favourite space.
The toy bin is in the South-East part of the gravel area. I’ve
trimmed the lower branches off the cedars and this is where the babies
like to play.
I took some close-up pictures of various objects in the yard and used
them to create ‘Where-Am-I’ cards. The children enjoyed searching the
new spaces to locate each item on their card.
These are also useful for learning to recognize our plants by the shape/colour of their leaves or the texture of their bark.
Most recently the upper deck has been transformed into a outdoor art
area. Yesterday was the first time the older children got to use it
during quiet time when the little ones were napping.
We’ve enjoyed exploring all the new spaces and are looking forward to many more adventures.
I’m a coffee drinker. A few months ago I began buying flavoured
coffee creamer as an occasional treat. After I emptied the first
container I rinsed it out and went to put it in the recycling bin but I
hesitated. I like to use sturdy empty containers from familiar products
for ‘readable’ toys in the housekeeping area.
This container was sturdy but I wasn’t sure if the children would be
familiar with the product. I decided to add it to the collection of
‘food’ on the shelf and see what they did with it. It was an instant
hit but not for the reason I expected.
Even after washing it out this container retains the aroma of the
flavoured cream. The children noticed immediately. ‘Smell this’ was
heard often and having only one container was becoming an issue so I had
to buy more. Vanilla Toffee, Mocha Almond Fudge, Carmel Macciato, and
my personal favourite, Chocolate Mint. MMmmm.
Then one day while several of the children were building with blocks
one of them farted. While most of the children groaned and covered
their noses one ingenious child ran to the housekeeping area and grabbed
a creamer container. The other children followed.
They had found the ‘cure for the stink bomb’.
These containers have never been used during dramatic play in a
coffee shop or restaurant but they are used almost daily as gas masks.
Once one of the children sends out the alarm the others all rush to get a
container, open it and hold it under their nose until the threat is
over. They have the solution.
There is a mountain in my yard. It is the last of the big plastic
toys remaining since I began replacing them with more natural, open
ended items. At one time the mountain belonged to my own – now adult –
children. The mountain is about 20 years old;
Small cars are stored in the lid of the mountain and the children
occaisionally use the roads and tunnels for driving or parking the cars
on. Back when the mountain used to be an indoor toy that was all it was
ever used for. It took up a lot of space for something that had only
one main purpose. After I moved it outdoors it got used for water and
gravel too.
I want to remove the mountain from the yard. It doesn’t ‘fit’ with the rest of our play space. We don’t need it. The children drive the cars all over the yard and even build their own roads and bridges with wood and gravel.
They use other – better – tools for moving gravel and water. I’ve
put these pipe halves in the loose parts area for that purpose and the
children experiment with them often;
The pipes can accommodate not only cars, gravel, and water but animals as well;
The pipes are not stationary so can be used in various locations as levers to lift and move gravel;
Usually the children need to work together and cooperate to get the result they want;
The other day they tried an Olympic inspired weight lifting event;
Water in the pipes adds another element to expeirment with – and the
results are sometimes surprisingly different than when using gravel;
We don’t need that mountain. I just need to figure out how to remove
it from the yard. I don’t think I can put it in the recycling bin but
maybe I’ll put it on the boulevard for the next give away weekend.
I had not planned to do a major renovation of our outdoor play space
this year. My husband and I have been talking about it for a few years
now but no date had been set because we were still unsure what we were
going to do. The problem was the ground level deck. It had originally
been built more than 12 years ago – back when the ancient maple tree was
still there;
Over the years there had been many changes including the removal of
most of the old tree and the addition of a covered seating area.
Most recently the old tree stump was completely removed to make room
for the new fence and the plexiglass painting area was added to the
seating area;
Through regular maintenance several deck boards had been replaced and
the deck had been stained or painted many times. It had gotten to the
point where any further cosmetic repairs were futile because the
underlying structure was near the end of its life.
I priced out the cost of rebuilding the entire deck and discovered
that the lumber alone would be more than four times the total cost of
the original deck and so labour intensive. If we were going to have to
pay that much then maybe there were other ground surface options.
We discussed the possibility of making a patio but didn’t like the
idea of cement bricks. I really liked the rubber patio pavers that I
had been using on the deck but I worried that they would get too hot if I
covered the entire area with them.
I liked many of the eco friendly – and local – products available at http://reliabletirerecycling.ca
but their site doesn’t list prices. My email requests were answered
promptly but only resulted in a suggestion that I come down in person –
they are not open evenings or weekends when I can get there.
Then I remembered something that I had heard about at MCCA’s conference last May. I quickly scoured my notes to find it. The workshop – presented by the amazing Bienenstock’s - had been about designing natural outdoor play spaces and we had spent part of our time creating models like this;
Many of my friends and colleagues questioned why I chose that
workshop since I already seem adept in this area. However, I knew I’d
enjoy it and there is always a chance to learn something new – and I did. During a discussion about the wear and tear on grassy areas we heard about Durolawn.
Now, I will admit that I am not patient enough to wait once I get one
of my ‘ideas’ so of course I needed to start work on this immediately.
No time to order supplies especially when I knew a place I could get a similar product today. The salesclerk at Jysk seemed somewhat stunned when I bought 50 rubber mats. Pictured upside down on their site here these mats do really look exactly like Durolawn and they were on sale too!
So now, after four solid 12 hour days of yard work over two weekends our deck area looks like this;
I created a pattern with the two different types of tiles. The brown
rubber tiles will remain solid rubber but the spaces in the black mats
will eventually fill with grass. I just planted the grass seeds
yesterday but I’ve already checked several times to see if any grass is
growing – remember, waiting for results is not my forte.
We’ve also reused the old bathtub and door from our bathroom remodel
as a water table and art wall. The plexiglass painting area has been
moved to form a new wall to support the arbour extension over the
walkway and provide a border for the gravel area;
My husband decided I needed an overhead view of the yard so he took my camera and climbed up on the roof;
In the future I hope to have some more pictures of the various areas
‘in use’ and of course – some grass too. Hey, maybe I’ll host the next
committee meeting for the upcoming Manitoba Nature Summit — we could play outside while we plan for ways to engage children with nature.
There have been many television shows and news reports that feature people who are considered to be hoarders – they have too much ‘stuff’. I hate those shows. You see, for me they hit really close to home. To hoard can also mean to save, store, amass, collect, stockpile, accumulate, gather, or put aside. I could be considered to be a hoarder.
Now, I’ll admit that some of the people on these shows are really out of control. If you can’t walk across a room because there is loose stuff all over the place then it is definitely time to clean up. Sometimes these shows offer really good suggestions on how to de-clutter and organize. However, they also annoy the ‘green’ side of me.
Just because you haven’t used something in a year or more doesn’t mean it is useless and even if you could buy another one doesn’t necessarily mean you should just throw something out. That is just wasteful. Sometimes I even covet the stuff they throw in their ‘trash’ piles – OMG do you know what I could do with that!?!
Certainly there are days that I wish that I could move all my ‘stuff’ to a warehouse where I’d have room to properly go through it all. I love the idea of being free of useless clutter. I detest when I have to go to the store to buy something that I can’t find but I know I have in my house somewhere. Whenever possible I also prefer to make things instead of buying them too. Reuse and recycle.
I had to laugh though when I saw these bread clips on my kitchen counter…
I picked them up and tossed them in the garbage. My husband looked confused and said “I left those there for you – I thought you saved them”. Yes, I had saved bags full of them — eighteen years ago when our son was in Kindergarten and his teacher collected them to use as math counters in her classroom. Can you imagine how many bread clips I would have if I had continued to save them for eighteen years!?! Now that would be hoarding.
Last week I watched as the baby took various toys and placed them in the toolbox and then dumped them out. It reminded me of something I had made many years ago…I had seen it again recently…where was it? It took less than five minutes for me to find it again. Lids from frozen juice containers and a coffee can with a slot cut in the lid;
Baby still likes that tool box better;
The preschoolers like the coffee can and tried to teach the baby how to put the lids in the slot. They call it the ‘clean-up game’ — dump them out and put them back in over and over again.
No one has used that thing in at least three years but I’m really glad I didn’t throw it out. Next week we might try some other activities with these lids. All fifty of them are numbered and some have stickers. We can use them for matching, sorting and sequencing too.
I am an ECE and I walk a really fine line between hoarding junk and saving useful stuff.
I planned to write a post first thing this morning before the children arrived but somebody desperately needed attention and so I abandoned my computer and paperwork. Seriously – who could resist?
So now I have to spend my evening at the computer and hope that cat doesn’t show up again.
I’m an advocate of loose parts but I also need to be organized and sometimes those two things collide. In the gravel area of the yard there are sticks and pipes, pinecones and pieces of bark, scraps of wood and other miscellaneous things.
Toys and other equipment are stored in bins in the deck box or the shed and brought out when needed. The loose parts are always out – loose – hence the name. This ever-changing supply of random items is strewn about the yard and sometimes makes it difficult to walk.
I find myself wandering around making arbitrary piles of unused things to get them out of the way and create walkways. I can’t really ask the children to ‘clean up’ because this stuff doesn’t have a spot where it belongs and besides, the mess is not bothering them.
Then, last weekend, as we were working on various projects outside my husband asks ‘What are you going to do with this?’ Oooh, I had forgotten about ‘that’ – A modular plastic cube thing that we picked up at the last Giveaway Weekend event. I think it was supposed to be a desk at one time but I just thought the cubes might come in handy for something, sometime. Until I could of a good use we just put them in the crawlspace and they’ve been there all winter. Until now when I did this;
I don’t expect the children to keep it all neat and organized like this. They will be free to move the pieces around the yard as they please. Build with them. Dig with them. Whatever they need or want them for. But we can also put them somewhere when they are not being used and that will make me happy. And maybe the children will like it too because the next time they are working on a building project and someone says ‘We need another small pipe’ they’ll know where to look first.
Interestingly though, when the children went out on Monday, the squeal and exclamation “Come. Look what happened – it’s amazing!” didn’t refer to my weekend organization. It was in reference to the growth of the native plants on the hill.
Yes, Mother Nature is amazing. That’s why we help her out by recycling. This weekend is another Giveaway Weekend. I wonder what we might find.


 No time to order supplies especially when I knew a place I could get a similar product today. The salesclerk at Jysk seemed somewhat stunned when I bought 50 rubber mats. Pictured upside down on their site


